> For the complete documentation index, see [llms.txt](https://docs.inverse.watch/llms.txt). Markdown versions of documentation pages are available by appending `.md` to page URLs; this page is available as [Markdown](https://docs.inverse.watch/user-guide/queries/creating-and-editing-queries.md).
# Creating and Editing Queries
To make a new query, click `Create` in the navibar then select `Query`.
writing a query
### 1. Query Editor
### i. Query Syntax
In most cases we use the query language native to the data source. In some cases there are differences or additions, which are documented on the [Data Sources](https://docs.inverse.watch/user-guide/data-sources) page.
### ii. Keyboard Shortcuts
* Execute query: `Ctrl`/`Cmd` + `Enter`
* Save query: `Ctrl`/`Cmd` + `S`
* Toggle Auto Complete: `Ctrl` + `Space`
* Toggle Schema Browser `Alt`/`Option` + `D`
### iii. Schema Browser
To the left of the query editor, you will find the Schema Browser:
schema browser
The schema browser will list all your tables, and when clicking on a table will show its columns. To insert an item into your query, simply click the double arrow on the right side. You can filter the schema with the search box and refresh it by clicking on the refresh button (otherwise it refreshes periodically in the background).
{% hint style="danger" %}
Please note that not all data source types support loading the schema.
{% endhint %}
You can hide the Schema Browser using the key shortcut or by double-clicking the pane handle on the interface. This can be useful when you want to maximize screen realestate while composing a query.
### iv. Auto Complete
The query editor also includes an Auto Complete feature that makes writing complicated queries easier. Live Auto Complete is on by default. So you will see table and column suggestions as you type. You can disable Live Auto Complete by clicking the lightning bolt icon beneath the query editor. When Live Auto Complete is disabled, you can still activate Auto Complete by hitting `CTRL` + `Space`.
{% hint style="warning" %}
Live Auto Complete is enabled by default unless your database schema exceeds five thousand tokens (tables or columns). In such cases, you can manually trigger Auto Complete using the keyboard shortcut.
{% endhint %}
Auto Complete looks for schema tokens, query syntax identifiers (like `SELECT` or `JOIN`) and the titles of [Query Snippets](https://docs.inverse.watch/user-guide/queries/query-snippets).
### 2. Query Settings
### i. Published vs Unpublished Queries
By default each query starts as an unpublished draft named **New Query**. It can’t be included on dashboards or used with alerts.
To publish a query, change its name or click the `Publish` button. You can toggle the published status by clicking the `Unpublish` button. Unpublishing a query will not remove it from dashboards or alerts. But it will prevent you from adding it to any others.
{% hint style="warning" %}
Publishing or un-publishing a query does not affect its visibility. All queries in your organization are visible to all logged-in users.
{% endhint %}
### ii. Archiving a Query
You can’t delete queries, but you can archive them. Archiving is like deleting, except **direct links to the query still work.** To archive a query, open the vertical ellipsis menu at the top-right of the query editor and click Archive.
archiving query
### iii. Duplicating (Forking) a Query
If you need to create a copy of an existing query (created by you or someone else), you can fork it. To fork a query, just click on the Fork button (see example below)
forking a query
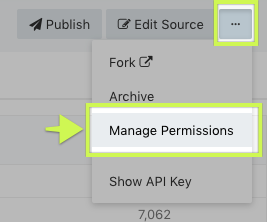
### iv. Managing Query Permissions
By default, saved queries can only be modified by the user who created them and members of the Admin group. But support to edit permissions with non-admin users has been included.
An Admin in your organization needs to enable it first. Open your organization settings and check the “Enable experimental multiple owners support”.
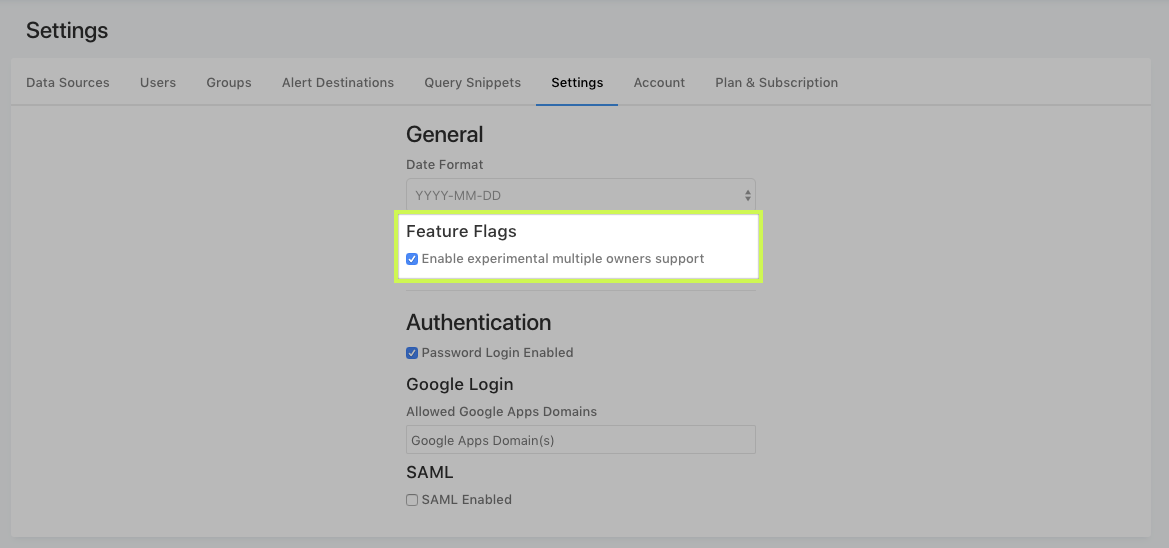
Now the Query Editor options menu includes a `Manage Permissions` option. Clicking on it it will open a dialog where you can add other users as editors to your query or dashboard.
Please note that currently the users you add won’t receive a notification, so you will need to notify them manually.
---
# Agent Instructions
This documentation is published with GitBook. GitBook is the documentation platform designed so that both humans and AI agents can read, navigate, and reason over technical content effectively. Learn more at gitbook.com.
## Querying This Documentation
If you need additional information that is not directly available in this page, you can query the documentation dynamically by asking a question.
Perform an HTTP GET request on the current page URL with the `ask` query parameter, and the optional `goal` query parameter:
```
GET https://docs.inverse.watch/user-guide/queries/creating-and-editing-queries.md?ask=&goal=
```
`ask` is the immediate question: it should be specific, self-contained, and written in natural language.
`goal` is optional and describes the broader end goal you are ultimately trying to accomplish on behalf of the user. GitBook uses it to tailor the answer towards what is most useful for that goal.
The response will contain a direct answer to the question and relevant excerpts and sources from the documentation.
Use this mechanism when the answer is not explicitly present in the current page, you need clarification or additional context, or you want to retrieve related documentation sections.